Note: This article is relevant only to Windows form applications.
In .NET each control is composed of a canvas on which rendering is performed. To use the canvas of a control one needs to add an event handler to the Paint event. This article provides a couple of examples how to use the Paint event. These examples extend the rendering of common controls during runtime.
Scenario 1:
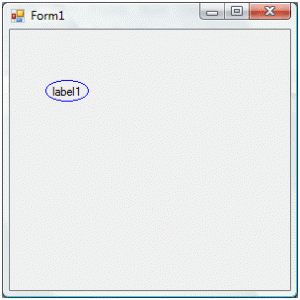
Let’s enhance a label to display an ellipse around the contents. First we need to bind an event handler to the label’s Paint event.
label1.Paint += new PaintEventHandler(label1_Paint);
The signature for the Paint event handler is defined as:
private void label1_Paint(object sender, PaintEventArgs e)
{}
The next step is to draw an ellipse that takes it dimensions from the label.
// Get the canvas on which the ellipse will be drawnGraphics canvas = e.Graphics;
// Draw the ellipsecanvas.DrawEllipse(Pens.Blue, e.ClipRectangle.X, e.ClipRectangle.Y, e.ClipRectangle.Width -2, e.ClipRectangle.Height - 2);
The purpose of the two statement above in the Paint event handler is to surround the label’s text within a blue ellipse.

Note: The label AutoSize property was switched off during this example in order to allow enough space for proper rendering of the ellipse. Also the Windows form components define the clip rectangle a little bigger than the visible canvas. The difference in between the clip rectangle and the actual visible size is the placeholder for the control border. Therefore to have a proper rendering of the ellipse the width and height coordinates require the removal of 2 pixels from the rectangle returned by the ClipRectange property.
Scenario 2:
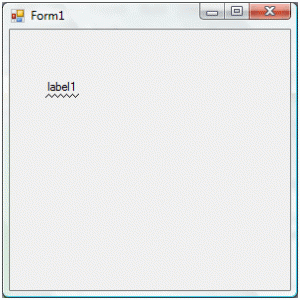
The label control directly supports the Underlining of text. However, let’s assume that a special underline effect is required. Say, we need to underline the text with a series of triangles next to each other.
Graphics canvas = e.Graphics;
// Determine the number of points required. The divisor number, 3, is determine by// the number of edges for each trianglePoint[] points = new Point[e.ClipRectangle.Width / 3];
for (int i = 0; i < points.Length; i += 2)
{// Draw the start pointpoints[i] = new Point((i * 3), e.ClipRectangle.Height - 2);
// Draw the middle pointpoints[i + 1] = new Point((i * 3) + 3, e.ClipRectangle.Height - 5);
// The end point is set by the next triangle start point}// Draw the trianglescanvas.DrawLines(new Pen(label1.ForeColor), points);

Note: Like in the previous example, the label AutoSize property was switched off to allow enough space for proper rendering of the triangles.
Scenario 3:
The last example in this article shows how to display text on a semi-elliptical path.
Graphics canvas = e.Graphics;
// The text that will be displayedstring displayText = "Writing on a path";
// Calculate the ellipse angle from the x-axisdouble beta = (Math.PI / 180);
double sinbeta = Math.Sin(beta);
double cosbeta = Math.Cos(beta);
// Get the x and y radiusdouble radiusX = -e.ClipRectangle.Width * 0.45;
double radiusY = e.ClipRectangle.Height * 0.8;
double step = 180.0 / displayText.Length;
for (int i = 0; i < displayText.Length; i++)
{// Calculate the angle tangentdouble alpha = (i * step) * (-Math.PI / 180);
double sinalpha = Math.Sin(alpha);
double cosalpha = Math.Cos(alpha);
// Move the canvas position onto a point of the ellipse pathcanvas.TranslateTransform(
Convert.ToSingle(((e.ClipRectangle.Width - 5) / 2) +
(radiusX * cosalpha * cosbeta - radiusY * sinalpha * sinbeta)),
Convert.ToSingle((e.ClipRectangle.Height - 10) +
(radiusX * cosalpha * sinbeta + radiusY * sinalpha * cosbeta)));
// Write the charactercanvas.DrawString(displayText[i].ToString(), this.Font, Brushes.Black, 0, 0);
// Reset all transformationcanvas.ResetTransform();
}

The example above uses some rendering techniques that have been placed to obtain the curved up effect displayed in the image above.
- The radius is measured in negative. The reason for this is to reverse the direction in which the text runs over the elliptical path.
double radiusX = -e.ClipRectangle.Width * 0.45;
- The radii are a percentage of the canvas. To have the centre of path in the middle of the canvas the x radius needs to be half or less of the canvas width. While as the arc needs to cover the entire height of the canvas, the ratio was put slightly lower that full to make sure that no text does outside the drawing area.
double radiusX = -e.ClipRectangle.Width * 0.45;
     double radiusY = e.ClipRectangle.Height * 0.8;
- The alpha angle is measured in negative. This is also related to the modifying the direction in which the ellipse points are calulated.
References
- MSDN: Control.Paint Event
- Wikipedia: Ellipse
- CodeProject: Customized Text – Orientated Controls in C# – Part I (Label Control)
