
Sitecore Habitat is an open source library that provides over 50 modules for Sitecore that can be used within any project. This article outlines one way of building Sitecore Habitat project into Nuget Packages using TeamCity.
Note: It is assumed that:
- You already have configured TeamCity Server and at least one TeamCity Build Agent.
- You have already set NodeJS plugin in TeamCity
- The Build Agents have Visual Studio 2015 Community (or licensed version) installed (Downloadable from: https://www.visualstudio.com/en-us/downloads/download-visual-studio-vs.aspx)
- The Build Agents have NodeJS installed globally (Downloaded from: https://nodejs.org/en/download/)
- You have read the previous article, Nuget Package Create through Powershell
Step 1: Create TeamCity Project
Go to the Projects section under Administration and create a new Project. Type a significant name for the project. In this article case, the Project is named: Habitat Module Builder.
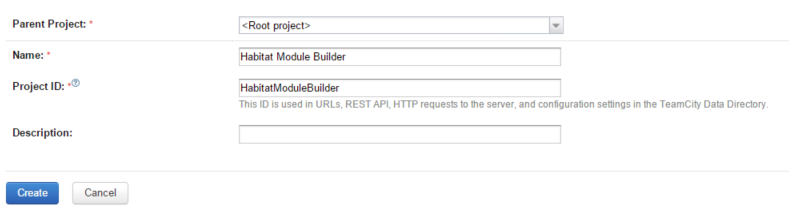
TeamCity Project Create
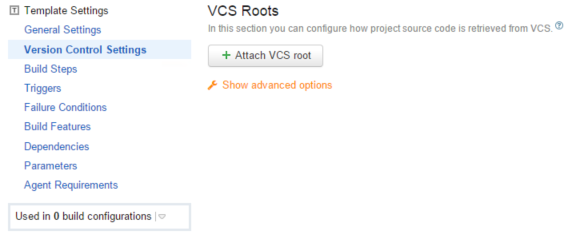
Step 2: Setup VCS Root
When the Create button is pressed a screen with the project configuration is shown. Select the VCS Roots tab and Create a VCS root pointing to the Habitat Github URL.
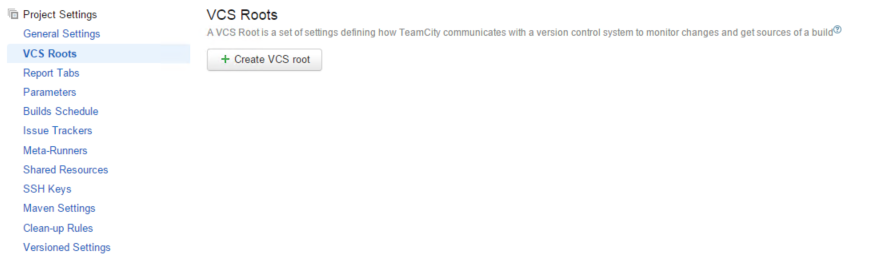
TeamCity VCS Root Create Option
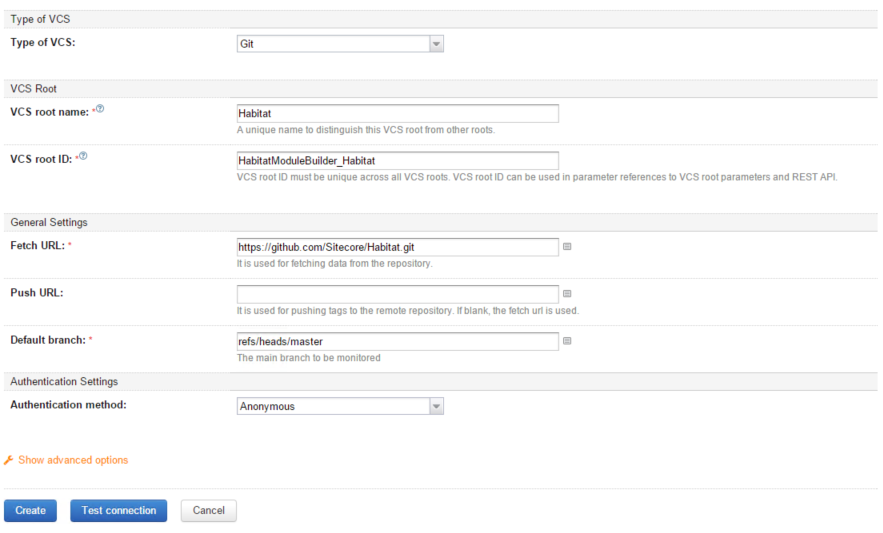
VCS Git setup
Note: Test the connection with Github before proceeding with Creating the VCS Root to ensure the settings are correct.
Step 3: Setting up Project Settings
Navigate to the General Settings tab to start building the configuration.
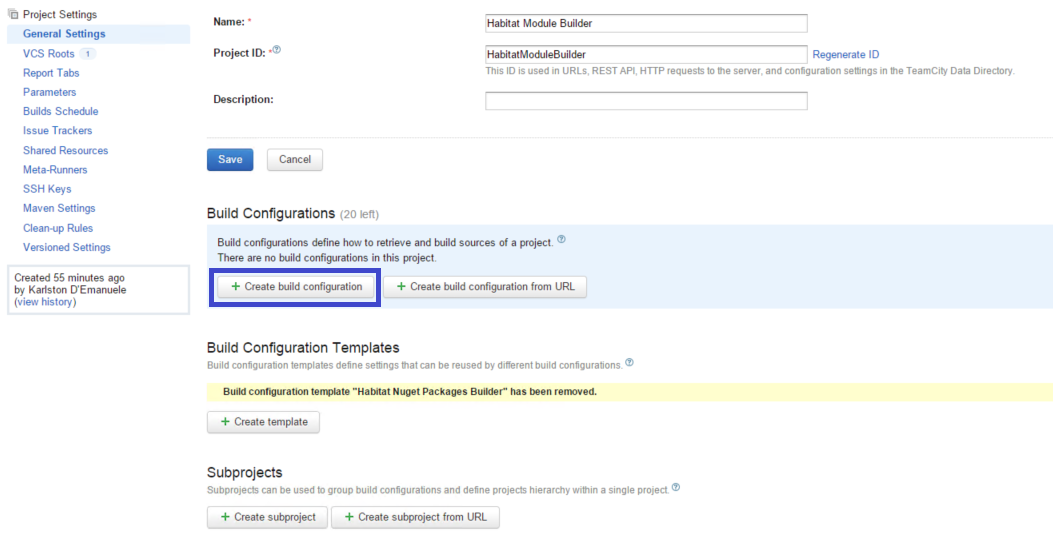
Create Build Configuration option in General Settings
Step 4: Set the Configuration name
For the purpose of this article the configuration is named: “Habitat Nuget Packages Builder”

Setting Configuration Name
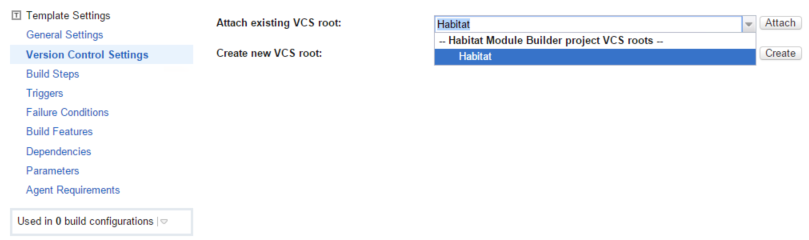
Step 5: Attach VCS Root to Configuration
Attach VCS Root Option
Selecting VCS Root
Note: Since the VCS Root was created earlier in the Attach VCS Root screen use the Attach existing option dropdown and press the Attach button.
Note: This step will trigger a search for build steps in the repository. The step can be cancelled as the build steps will be defined manually later on.
Step 6: Set up VCS Triggers
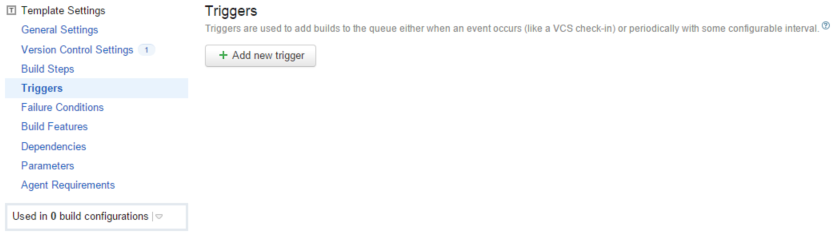
Add new Trigger option
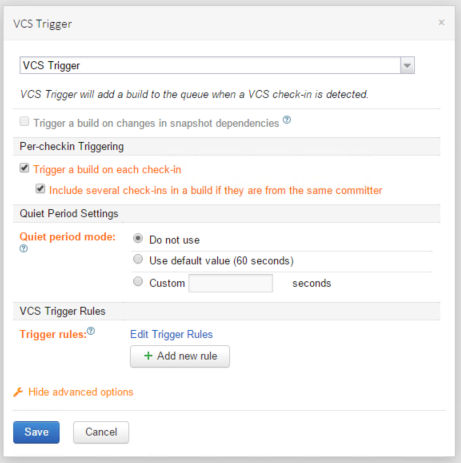
Setting up the Trigger option
Note: The options in orange are shown by clicking the “Show advanced options” link.
Step 7: Start setting up the Build Steps
The Build Steps screen provides two options: Add build step and Auto-detect build steps. We will make use of the manual Build step, since the project cannot be triggered through msbuild alone.
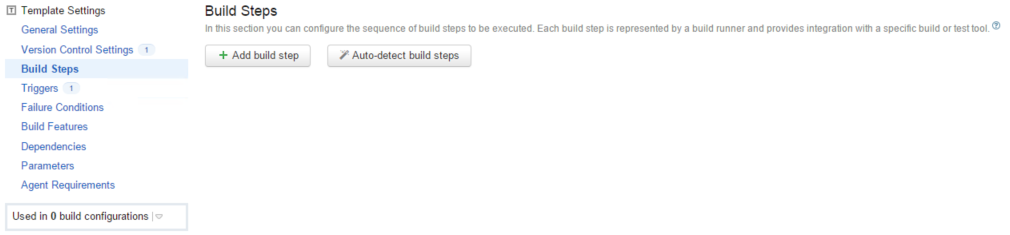
Add Build step
Step 8: Install NodeJS libraries on the Build Agent for the project
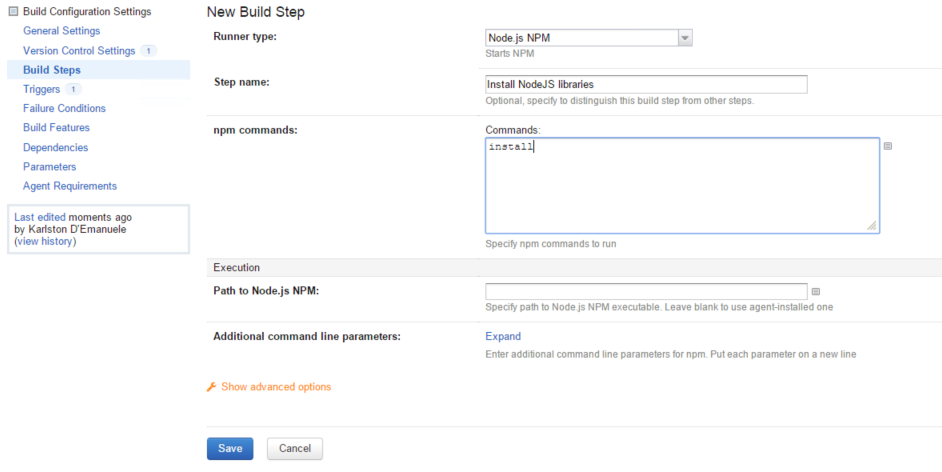
Configuration for automatic install of NodeJS libraries on the Build Agent at Project level
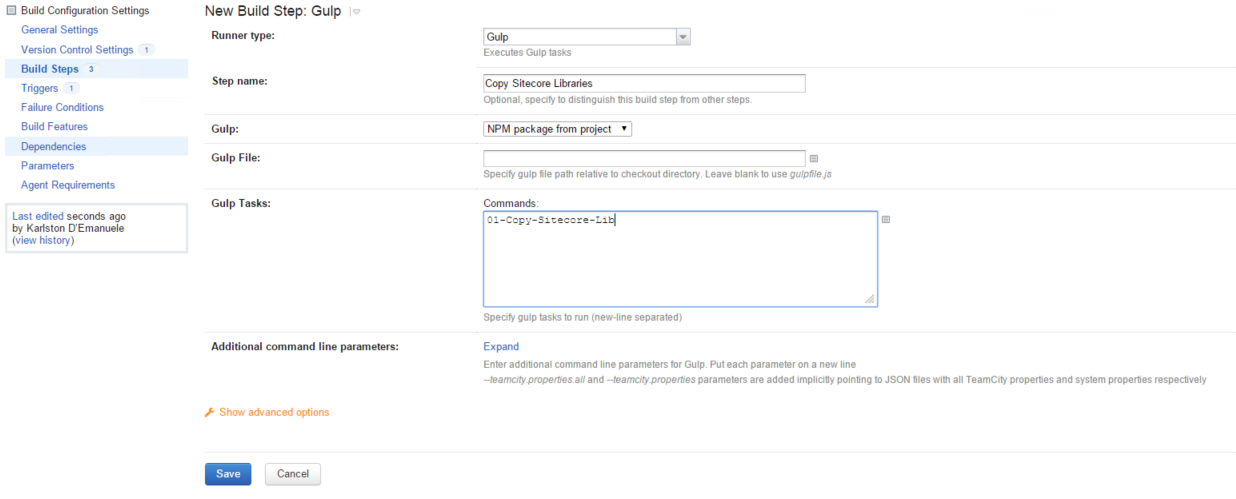
Step 9: Make sure to have Sitecore DLLs somewhere where the Build Agents can find them
The Habitat project comes with a Gulp script that copies over the Sitecore Libraries to all projects. In order for the build to succeed it is important that Gulp script finds the Sitecore Libraries to copy them over. For this article, we will be assuming that the DLLs are located in the location C:\Sitecore\Lib.
Step 10: Configure Gulp
Gulp uses the file gulp-config.js as a configuration. Using Powershell scripting the gulp-config.js file is manipulated to point to the Build Agent Sitecore library files.
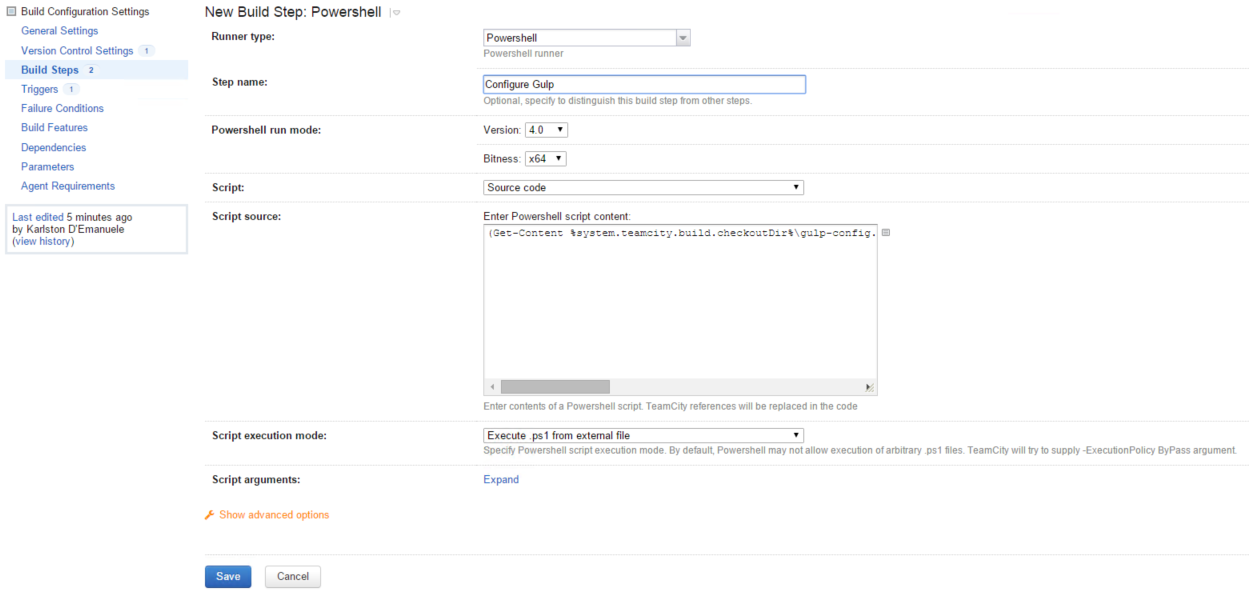
Powershell script setup for Gulp Configuration manipulation
(Get-Content %system.teamcity.build.checkoutDir%\gulp-config.js).Replace("C:\\websites\\Habitat.local\\Website\\bin", "C:\\Sitecore\Lib") | Set-Content %system.teamcity.build.checkoutDir%\gulp-config.js
Code 1: Powershell Script for Gulp Configuration manipulation
Step 11: Run Gulp Command to Copy Sitecore Libraries
Gulp setup to copy Sitecore Libraries
Step 12: Restore Nuget Packages
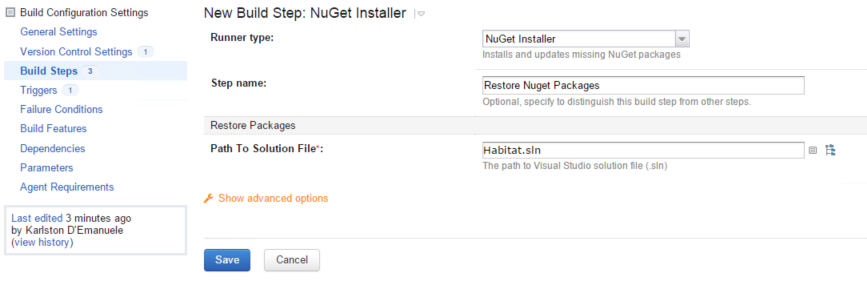
Restore Nuget Packages Step
Step 13: Build The solution
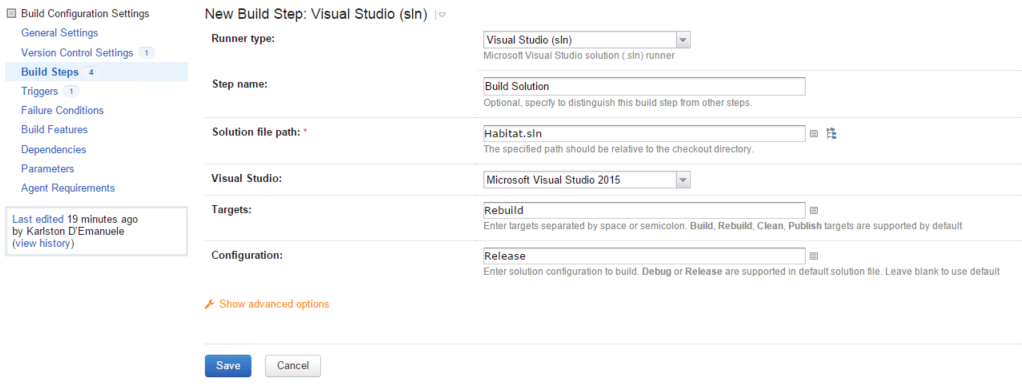
Build the solution with Visual Studio
Step 14: Create NuGet Specifications for all projects
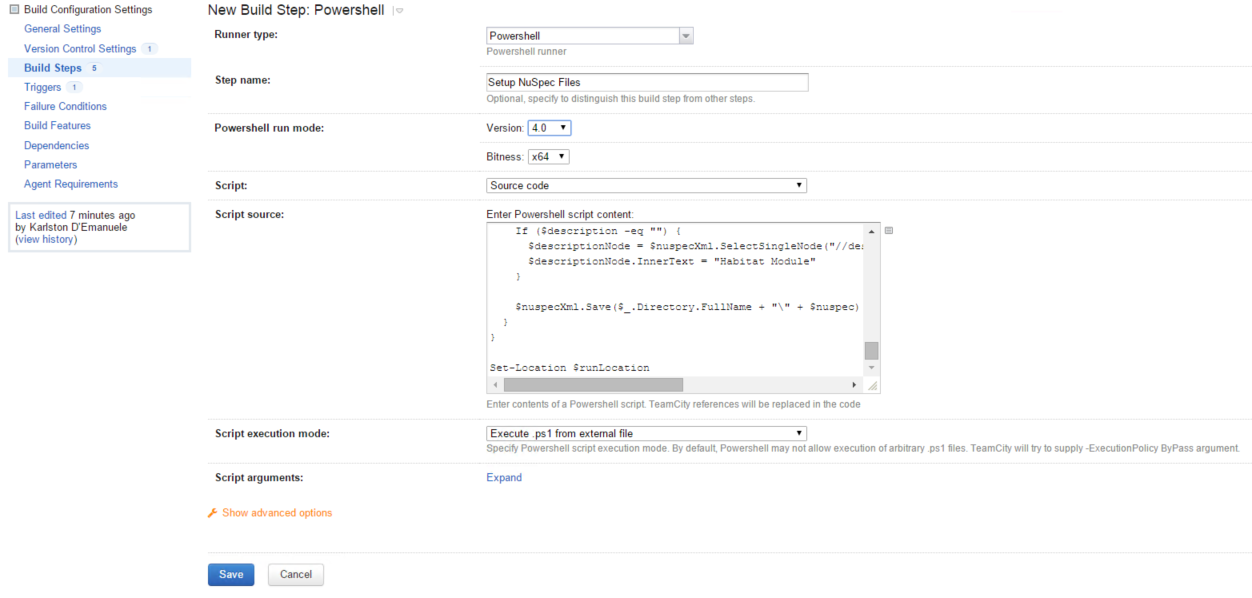
Powershell script setup for Nuspec creation
# Add System.Web to HTML encode copyright stringAdd-Type -AssemblyName System.Web
# Storing the Powershell execution location to restore path at the end$runLocation = $PSScriptRoot
get-childitem "%system.teamcity.build.checkoutDir%\src" -recurse | where {$_.extension -match ".\w\wproj"} | % {
if (-Not ($_.Directory -match "Tests$" -Or $_.Name -match "Website|Demo")) {
Set-Location $_.Directory
%teamcity.agent.tools.dir%\NuGet.CommandLine.DEFAULT\tools\NuGet.exe spec -f
$assemblyName = [System.IO.Path]::GetFileNameWithoutExtension($_.Name)
$nuspec = "$assemblyName.nuspec"
[xml]$nuspecXml = (Get-Content $nuspec)
$licenseUrlNode = $nuspecXml.SelectSingleNode("//licenseUrl")
$licenseUrlNode.ParentNode.RemoveChild($licenseUrlNode)
$iconUrlNode = $nuspecXml.SelectSingleNode("//iconUrl")
$iconUrlNode.ParentNode.RemoveChild($iconUrlNode)
$releaseNotesNode = $nuspecXml.SelectSingleNode("//releaseNotes")
$releaseNotesNode.ParentNode.RemoveChild($releaseNotesNode)
$tagsNode = $nuspecXml.SelectSingleNode("//tags")
$tagsNode.ParentNode.RemoveChild($tagsNode)
$projectUrlNode = $nuspecXml.SelectSingleNode("//projectUrl")
$projectUrlNode.InnerText = "https://github.com/Sitecore/Habitat"
if (Test-Path ..\serialization) {
$filesNode = $nuspecXml.CreateNode("element", "files", "")
$fileNode = $nuspecXml.CreateNode("element", "file", "")
$fileSrcAttribute = $nuspecXml.CreateAttribute("src")
$fileSrcAttribute.Value = "..\serialization\**\*"
$fileNode.SetAttributeNode($fileSrcAttribute)
$fileSrcAttribute = $nuspecXml.CreateAttribute("target")
$fileSrcAttribute.Value = "content\serialization\$assemblyName"
$fileNode.SetAttributeNode($fileSrcAttribute)
$filesNode.AppendChild($fileNode)
$nuspecXml.LastChild.AppendChild($filesNode)
}$assemblyInfo = (Get-Content Properties\AssemblyInfo.cs)
$copyright = ($assemblyInfo -match 'AssemblyCopyright\(".*"\)')
$copyright = $copyright -split ('"')
$copyright = $copyright[1]
$copyrightNode = $nuspecXml.SelectSingleNode("//copyright")
$copyrightNode.InnerText = [System.Web.HttpUtility]::HtmlEncode($copyright)
$author = ($assemblyInfo -match 'AssemblyCompany\(".*"\)')
$author = $author -split ('"')
$author = $author[1]
If ($author -eq "") {
$authorNode = $nuspecXml.SelectSingleNode("//authors")
$authorNode.InnerText = "Habitat Community"
$ownersNode = $nuspecXml.SelectSingleNode("//owners")
$ownersNode.InnerText = "Habitat Community"
}$description = ($assemblyInfo -match 'AssemblyDescription\(".*"\)')
$description = $description -split ('"')
$description = $description[1]
If ($description -eq "") {
$descriptionNode = $nuspecXml.SelectSingleNode("//description")
$descriptionNode.InnerText = "Habitat Module"
}$nuspecXml.Save($_.Directory.FullName + "\" + $nuspec)
}}Set-Location $runLocation
Code 2: Powershell script for Nuspec creation
Step 15: Build NuGet packages
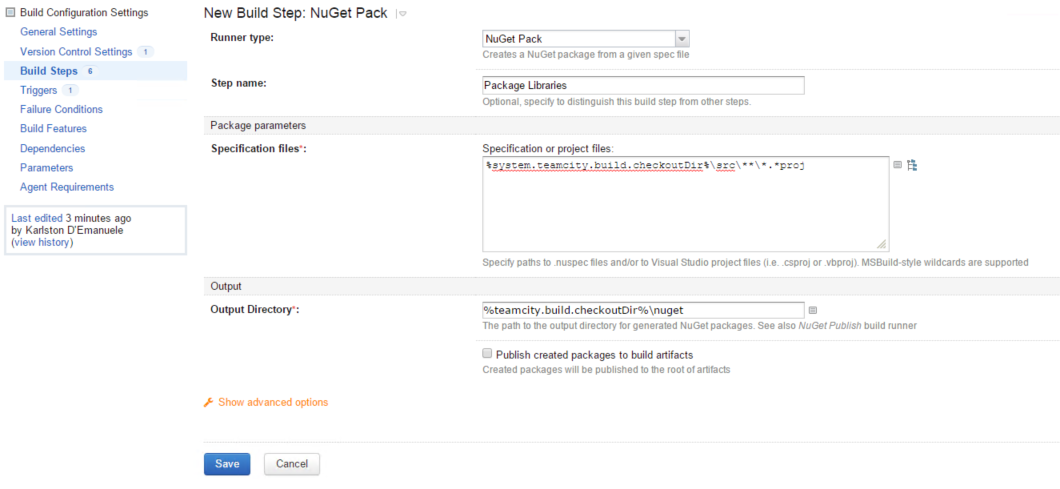
NuGet Package Step
Step 16: Publish NuGet packages to local Nuget Server
Note: In this article it assumed that the local Nuget Server is accessed through the URL http://nuget.dev. Please ensure that you change this to your actual local Nuget Server.
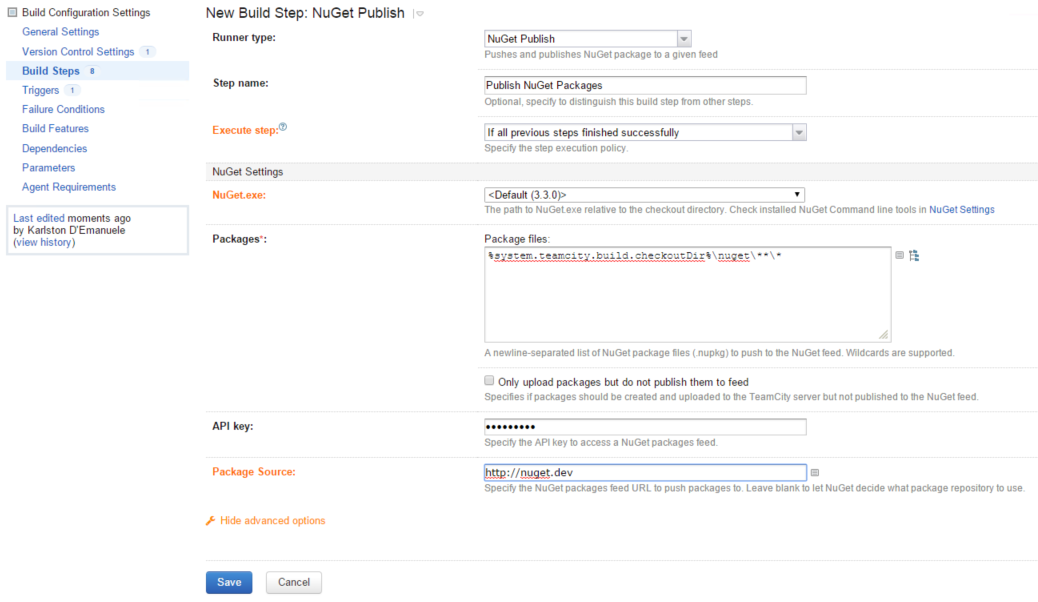
Publish Nuget Packages Step
Note: You need to open the advanced options to set the Nuget Server location.
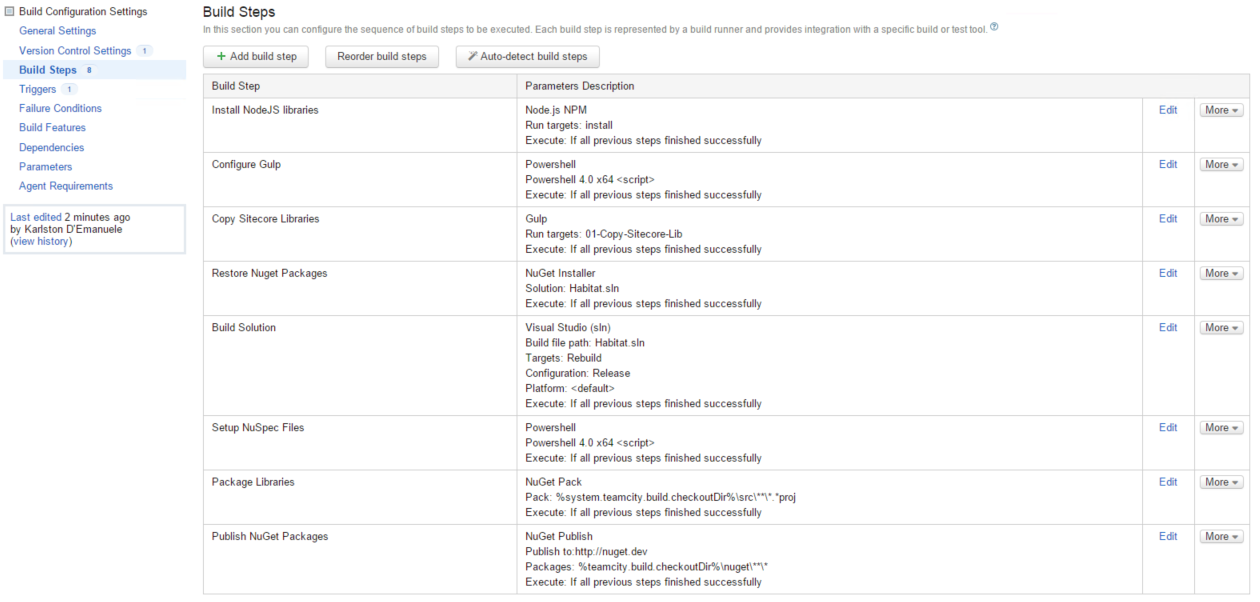
Complete Project configuration look
Step 17: Verify that the build ran successfully
Build Result is Green
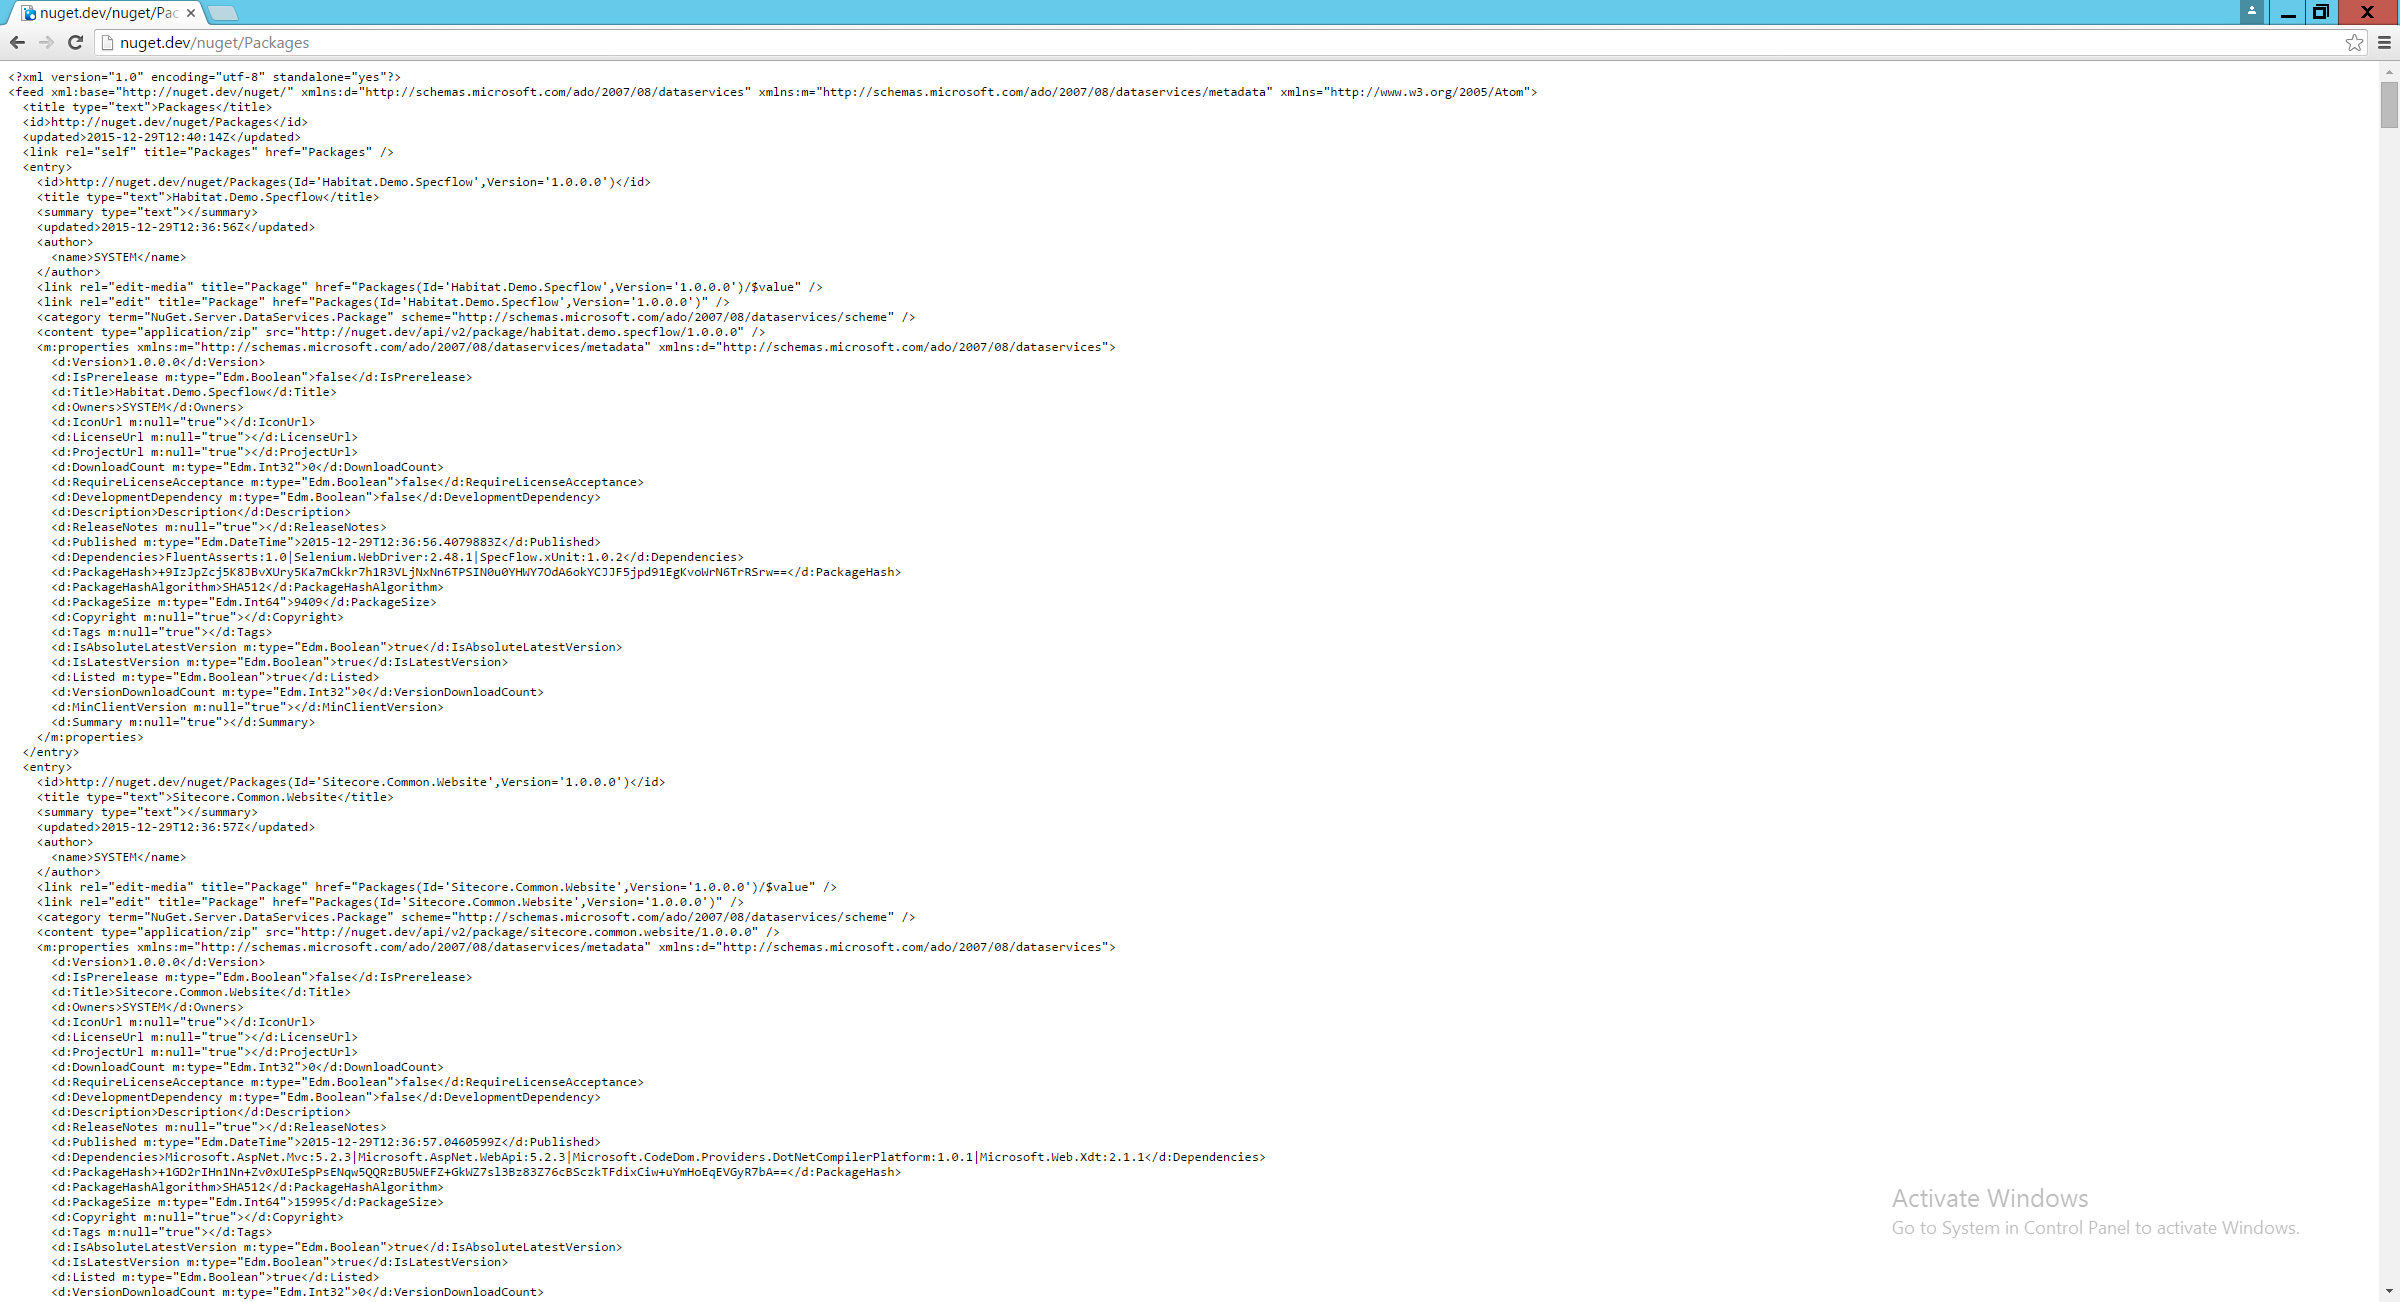
NuGet Server showing the Packages (XML feed)
Sharing other consideration
Consideration 1: Clean Policy for Git
Due to the manipulations that are performed during the build it is ideal to clean the checked out code with each git pull. To do this, go in VCS Root edit screen. Click the ‘Show advanced options’ and set the Clean Policy option to Always.
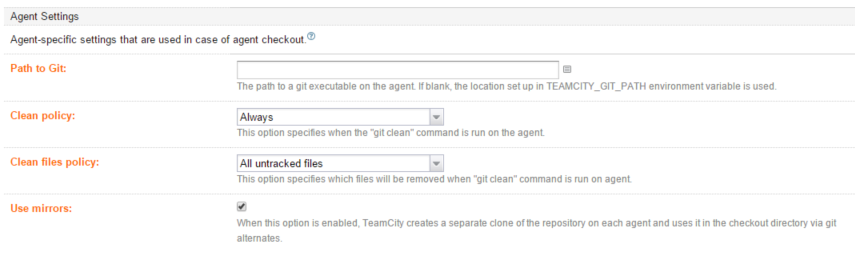
Git Checkout Clean Policy
Consideration 2: Test at each step
When building large configurations like this one, it is important that to test at each step to ensure that things work as expected. Especially where Powershell scripts are used as locations, especially for the NuGet.exe file, might change based on the build agent configuration.