
Magento 2 is not just a version upgrade to Magento 1.X but a complete platform restructure which introduce new programming paradigms and best practices. This article attempts to highlight the steps required to create a basic Magento 2 extension, as of Magento 2 0.74.0-beta7.
For the purpose of this introductory article a simple module will be created that prints Hello on the screen. You can use this as the base for your more elaborate extension.
Creating a simple controller that echo’s Hello on the screen
In Magento 2 there is no segregated location for extensions, but all code must go to the app/code folder. The best practice, as at the time of writing, is to create a folder under app/code to hold all your extension. In this example we use app/code/Clounce.
Now that the container folder ‘Clounce’ has been created, the extension folder can be added under the container. As a best practice the extension name needs to be significant to its purpose and as the example prints Hello on the screen the extension will be named ‘DisplayHello’.
The first configuration is to have the extension loaded in Magento by creating the module configuration file. This configuration file, module.xml, defines the version of the extension together with the modules that are required to be installed and active for the extension to properly work.
/app/code/Clounce/DisplayHello/etc/module.xml

<?xml version="1.0"?>
<!--
/**
* Copyright © 2015 Clounce. All rights reserved.
* See COPYING.txt for license details.
*/
-->
<config xmlns:xsi="http://www.w3.org/2001/XMLSchema-instance"
  xsi:noNamespaceSchemaLocation="../../../../../lib/internal/Magento/Framework/Module/etc/module.xsd">
    <module name="Clounce_DisplayHello" setup_version="0.1.0">
        <sequence>
            <module name="Magento_Core" />
        </sequence>
    </module>
</config>
In the code sample above, the configuration file is extended with the sequence element. The sequence element defines the dependencies of the module on other modules. If the section is not defined it is assumed that there are no dependencies for the module.
Registering the module in Magento
Differently from Magento 1, where the module xml is used to register the module, Magento 2 requires the module to be explicitly registered. Registration of modules is done by adding a new entry in the ‘modules’ section of the configuration array in app/etc/config.php file. The entry requires a key/value pair, where the key is the module name and the value is either 0 or 1. A value of 0 means that the module is disabled, while 1 indicates that the mode is enabled.
/app/etc/config.php

...
'modules'=>
array (
  ...
  'Magento_Wishlist' => 1,
     'Clounce_DisplayHello' => 1,
),
...
Finally to completely register the module in Magento we need to update the installation so that any scripts are executed and the module is registered in the database. To do this, access the server Magento installation. In the command line execute the command:
php bin/magento setup:upgrade
The next step is to clear the cache. Cache clearing can be done either through the Magento backend or from the command line. The latter is performed by deleting the contents of the folders:
- cache – Magento standard cache
- generation – The compiled code of Magento
- page_cache – Magento Full Page cache
- view_preprocessed – Compiled code for Magento templates.
The module has now been registered but does not output anything to the screen as yet. To get the output to the screen a controller needs to be defined to receive the request and outputs the ‘Hello’ message. We will do this together in the next section.
Defining the action to output ‘Hello’ on screen
Differently from Magento 1.X where a controller was defined under the ‘controllers’ folder with the file name being the controller handling actions in Magento 2, a controller is defined in the structure Controller/<controller_name>/<action_name>.php. Note that both the controller_name and action_name need to start with a capital letter. In this very simple example both the controller and action names will be ‘Index’.
/app/code/Clounce/DisplayHello/Controller/Index/Index.php

<?php
/**
 * Copyright © 2015 Clounce. All rights reserved.
 * See COPYING.txt for license details.
 */
namespace Clounce\DisplayHello\Controller\Index;

/**
 * Display Hello on screen
 */
class Index extends \Magento\Framework\App\Action\Action
{

    /**
     * Default hello page
     *
     * @return void
     */
    public function execute()
    {
        $name = $this->getRequest()->getParam('name');
        $this->getResponse()->setBody("<h1>Hello $name</h1>");
    }
}
Note:
- The path to the action file is now a PHP namespace.
- Action files need to extend the \Magento\Framework\App\Action\Action class.
- The function that handles the logic of the controller is called execute() and needs to be present in all controller actions.
The syntax of the controller code is on purpose. Magento 2 best practices require that the PSR-2 coding standards are followed. PSR-2 is outlined in http://www.php-fig.org/psr/psr-2/ as:
- Code MUST use 4 spaces for indenting, not tabs.
- There MUST NOT be a hard limit on line length; the soft limit MUST be 120 characters; lines SHOULD be 80 characters or less.
- There MUST be one blank line after the namespace declaration, and there MUST be one blank line after the block of use declarations.
- Opening braces for classes MUST go on the next line, and closing braces MUST go on the next line after the body.
- Opening braces for methods MUST go on the next line, and closing braces MUST go on the next line after the body.
- Visibility MUST be declared on all properties and methods; abstract and final MUST be declared before the visibility; static MUST be declared after the visibility.
- Control structure keywords MUST have one space after them; method and function calls MUST NOT.
- Opening braces for control structures MUST go on the same line, and closing braces MUST go on the next line after the body.
- Opening parentheses for control structures MUST NOT have a space after them, and closing parentheses for control structures MUST NOT have a space before.
But hold your horses, how is the module controller going to be called?
Magento 2 determines which module is to listen for a request based on a routing table, which maps a request to the respective controller. To add the module to the routing table, a new configuration file called ‘routes.xml’ needs to be defined under the ‘etc/frontend’ folder. The frontend folder is used to indicate that the route is only available for Magento frontend and not for the backend. When creating a backend route the routes.xml is to be placed under the ‘etc/adminhtml’ folder.
/app/code/Clounce/DisplayHello/etc/frontend/routes.xml

<?xml version="1.0"?>
<!--
/**
* Copyright © 2015 Clounce. All rights reserved.
* See COPYING.txt for license details.
*/
-->
<config xmlns:xsi="http://www.w3.org/2001/XMLSchema-instance"
  xsi:noNamespaceSchemaLocation="../../../../../../lib/internal/Magento/Framework/App/etc/routes.xsd">
    <router id="standard">
        <route id="clounce_hello" frontName="clounce_hello">
            <module name="Clounce_DisplayHello"/>
        </route>
    </router>
</config>
Notes:
- The route id attribute must be unique for each extension.
- The route frontName is the module identifier in the URLs.
- The name in the module element needs to match the module name used in the module.xml file.
Now the module is ready and can be accessed through the URL
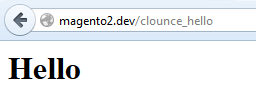
Figure 1: Printing Hello on its own
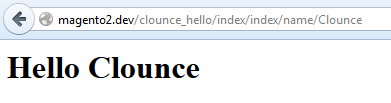
Figure 2: Printing Hello with the name from the parameters
Other Points to Note
During the creation of the example a number of Magento 2 coding standards have been presented but uncommented, while others were not shown. These are:
- Magento folder and file names
Similar to Magento 1.X the extensions folders make use of UpperCamelCase (Pascal Case). A change from Magento 1.X to Magento 2 is that in the PHP files naming convention. As Magento 2 is using namespaces the file names must also start be in UpperCamelCase. - Document blocks around files, classes and methods
Magento 2 best practices recommend that each file besides having a document block with each class and method it is recommended that at beginning of the file a document block with the copyright details is included. - Each module must include a README.md file and a copy of the license.
- Each module should have a composer.json file that describes the extension requirements. The composer.json file looks like:
/app/code/Clounce/DisplayHello/composer.json

{
    "name": "Clounce/module-displayhello",
    "description": "Displays the text Hello to the user",
    "require": {
        "php": "~5.5.0",
        "magento/module-core": "0.74.0-beta2",
        "magento/framework": "0.74.0-beta2",
        "magento/magento-composer-installer": "*"
    },
    "type": "magento2-module",
    "version": "0.74.0-beta2",
    "license": [
        "OSL-3.0",
        "AFL-3.0"
    ],
    "extra": {
        "map": [
            [
                "*",
                "Clounce/DisplayHello"
            ]
        ]
    }
}
Putting the best practices in place the final module structure for this very simple module looks like:
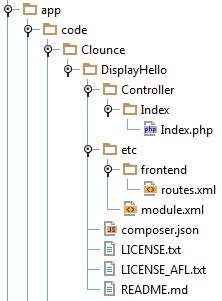
Figure 3: Magento 2 Basic module structure
Summary for creating a Magento 2 base module structure:
- Create a namespace folder under app/code
- Create the extension folder under the created namespace folder
- Under the extension folder create a new folder named ‘etc’
- Create a module.xml file containing the module name, version and dependencies
- Create a frontend folder
- Under the frontend folder place the routes.xml file mapping your extension URL to the extension