
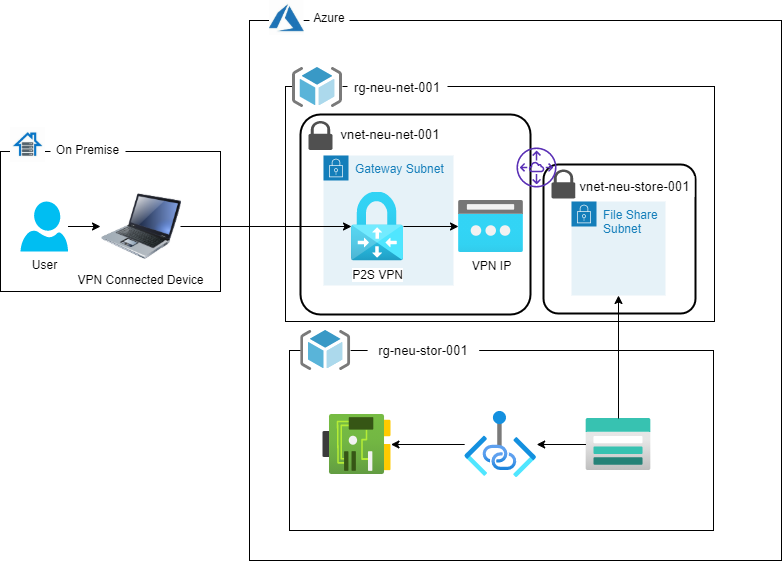
When working with Azure Storages security of data is a common topic of discussion. With the latest changes in Azure, the security of the data at rest is now by default. It is also possible to set the transfer of files to use TLS 1.2 for further security. However a commonly missed security setting is to lock the network traffic to specific resources. Azure Storages provide 2 mechanisms to lock the network traffic:
- By specifying a set of selected networks, within your own configuration, and allowing some services, like Azure trusted services to bypass the locking.
- By allowing access only through a Private endpoint. This is the ideal scenario when used with Virtual Machines (VMs).
When a Storage Account is locked to a selected virtual networks (vnets), accessing the account file share or containers from the Azure Portal will not work. Also, if one tries to mount the file share over SMB 3 on their personal machine the mount will fail, as the Storage Account cannot be accessed. To overcome these limitations a Point to Site (P2S) VPN can be used.
The rest of the article provides the steps to setup the P2S VPN and the storage account.
Step 1: Declaring some variables that will be used
$AzureEnvironment = [PSCustomObject]@{
Location = 'North Europe'
Code = 'neu'
}$Tags = @{
scope = 'training'
practice = 'VPN Access to Storage'
}$VpnDnaLabel = 'kdm-vpn-test'
$DomainCN = 'P2SCertificate'
$ShareName = 'testshare'
$ClientVpnCertificate = 'vpn.pfx'
For the purpose of this article the North Europe region is used for the implementation. Any region can be used.
Note: As naming and region conventions that Microsoft suggested names are followed as close as possible
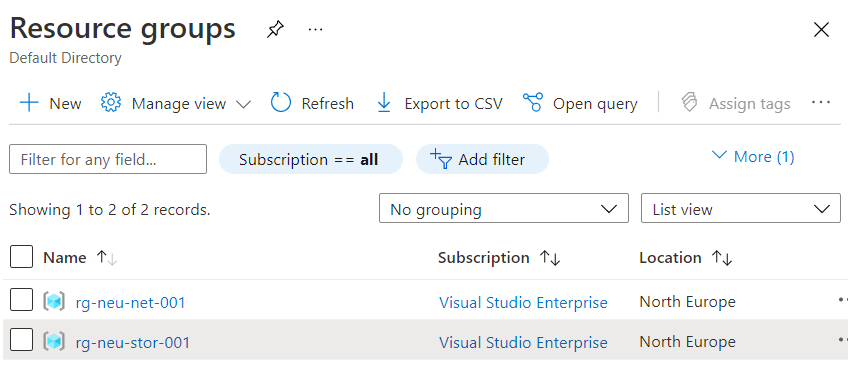
Step 2: Creating the Resource Groups
As with typical Enterprise setups, different resource groups are used to group resources for a specific functionality. This ensures that it is easy to manage related resources.
Two resource groups will be created, one to contain all the networking related resources while the second will contain the storage account and related resources.
Write-Host -ForegroundColor Yellow "Creating Networking Resource Group"
$RgNetworking = New-AzResourceGroup `
-Name "rg-$($AzureEnvironment.Code)-net-001" `
-Location $AzureEnvironment.Location `
-Tag $Tags
Write-Host -ForegroundColor Yellow "Creating Storage Resource Group"
$RgStorage = New-AzResourceGroup `
-Name "rg-$($AzureEnvironment.Code)-stor-001" `
-Location $AzureEnvironment.Location `
-Tag $Tags
Step 3: Creating the VPN Subnet
Later on in the setup the VPN subnet ID is required. The best way to have an ID assigned to a subnet is to create it before creating the virtual network and then assign it as part of the creation command.
Write-Host -ForegroundColor Yellow "Creating VPN Subnet"
$SnetGateway = New-AzVirtualNetworkSubnetConfig `
-Name "gatewaysubnet" `
-AddressPrefix "10.1.250.0/27" `
-ServiceEndpoint Microsoft.Storage
Note the address space that the subnet will use. The CIDR of 27 means that the only 27 IPs will be available in the subnet, since the remaining 5 IPs will be used by Azure.
Step 4: Creating the Virtual Networks (VNets)
Write-Host -ForegroundColor Yellow "Creating Networking VNet (DDos Protection recommended for Enterprise setups)"
$VnetNetwork = New-AzVirtualNetwork `
-Name "vnet-$($AzureEnvironment.Code)-net-001" `
-ResourceGroupName $RgNetworking.ResourceGroupName `
-Location $AzureEnvironment.Location `
-AddressPrefix 10.1.0.0/16 `
-Subnet $SnetGateway `
-Tag $Tags
Write-Host -ForegroundColor Yellow "Creating Storage VNet"
$VnetStorage = New-AzVirtualNetwork `
-Name "vnet-$($AzureEnvironment.Code)-stor-001" `
-ResourceGroupName $RgNetworking.ResourceGroupName `
-Location $AzureEnvironment.Location `
-AddressPrefix 10.2.0.0/24 `
-Tag $Tags
Step 5: Creating a Public IP resource for the VPN
The VPN is used to connect external resource to the Azure resources. For the VPN to become available over the Internet, it requires a Public IP. For the purpose of this article the Basic Public IP is used. However for enterprise level VPNs a Standard Public IP might be more suited.
Write-Host -ForegroundColor Yellow "Creating VPN Public IP"
$VpnIp = New-AzPublicIpAddress `
-ResourceGroupName $RgNetworking.ResourceGroupName `
-Name "pip-$($AzureEnvironment.Code)-vpn-001" `
-Location $AzureEnvironment.Location `
-Sku Basic `-AllocationMethod Dynamic `-DomainNameLabel $VpnDnaLabel `
-IpAddressVersion IPv6 `-Tag $Tags
Step 6 (Optional): Creating Self-Signed Certificates
To build this article proof of concept, a self-signed certificate is created to be used with P2S VPN. However, it might be ideal for enterprise scenarios to use an Authoritative CA Certificate.
Write-Host -ForegroundColor Yellow "Generate VPN Certificate"
$P2SCert = New-SelfSignedCertificate `
-Type Custom `
-KeySpec Signature `-Subject "CN=$DomainCN" `
-KeyExportPolicy Exportable `-KeyAlgorithm RSA `-KeyLength 4096 `
-CertStoreLocation "Cert:\CurrentUser\My" `
-KeyUsageProperty Sign `-KeyUsage CertSign$CertificateFingerPrint = [System.Convert]::ToBase64String($P2SCert.RawData)
$CertificateForVpn = New-AzVpnClientRootCertificate `
-Name 'SelfSignedCert' `
-PublicCertData $CertificateFingerPrint
Write-Host -ForegroundColor Yellow "Generate Client Certificate"
$ClientCert = New-SelfSignedCertificate `
-Type Custom `
-KeySpec Signature `-Subject "CN=Client$DomainCN" `
-KeyExportPolicy Exportable `-KeyAlgorithm RSA `-KeyLength 4096 `
-CertStoreLocation "Cert:\CurrentUser\My" `
-Signer $P2SCert `
-TextExtension @("2.5.29.37={text}1.3.6.1.5.5.7.3.2")
Write-Host -ForegroundColor Yellow "Generate Password for Pfx file"
$CertPass = ConvertTo-SecureString `
-String ([System.Web.Security.Membership]::GeneratePassword(32, (Get-Random -Minimum 5 -Maximum 16))) `
-Force `-AsPlainTextWrite-Host -ForegroundColor Yellow "Exporting Password for Pfx file"
Export-PfxCertificate `-Cert $ClientCert.PSPath `
-FilePath $ClientVpnCertificate `
-Password $CertPass `
-ChainOption BuildChain$bstr = [System.Runtime.InteropServices.Marshal]::SecureStringToBSTR($CertPass)
$plaintext = [System.Runtime.InteropServices.Marshal]::PtrToStringAuto($bstr)
Write-Host -ForegroundColor Red "Main Certificate Pfx key: $plaintext"
Write-Host -ForegroundColor Green "Removing VPN Certificate from Certificates store"
Remove-Item $P2SCert.PSPath -Force
A lot of code is requires to create the self-signed certificates. Starting from the server Fingerprint that will act as a root certificate for the connection. This is created from Line 94 to 106. The next step is to prepare it in the object expected by the P2S VPN, lines 108 to 110.
Once the root certificate has been created the certificate to be used by the remote computer is created, lines 126 to 129. Although for a proof of concept it is typically to run the VPN connection on the same machine that generated the certificates, this is not true for enterprise setups. From line 131 to 140, the client certificate is exported protected with a password. As the password is automatically created and will be required when reinstalled on a remote machine, it is outputted to the screen. It is important to keep the password safe and secure.
The last line of the snippet will remove the root certificate from the machine on which it was created. This step should be commented out if future VPN client certificates are to be created.
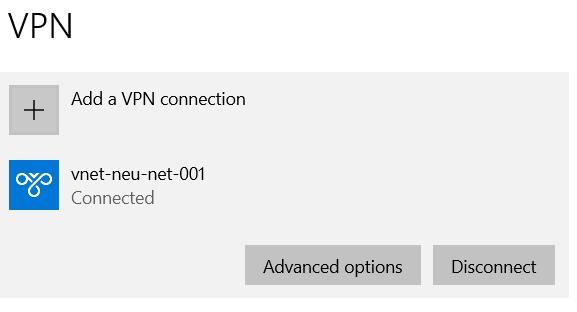
Step 7: Creating the VPN
Now that the required resources by the VPN have been created, the VPN itself can be created. The last step required before creating the VPN is to assign the Public IP created in Step 5, is assigned to the VPN being created.
Write-Host -ForegroundColor Yellow "Creating the VPN"
$SnetGateway = Get-AzVirtualNetworkSubnetConfig `
-Name "gatewaysubnet" `
-VirtualNetwork $VnetNetwork
$GatewayIpConfig = New-AzVirtualNetworkGatewayIpConfig `
-Name "vpnip-$($AzureEnvironment.Code)-p2s-001" `
-SubnetId $SnetGateway.Id `
-PublicIpAddressId $VpnIp.Id
$Vpn = New-AzVirtualNetworkGateway `
-Name "vpn-$($AzureEnvironment.Code)-p2s-001" `
-ResourceGroupName $RgNetworking.ResourceGroupName `
-Location $AzureEnvironment.Location `
-GatewayType Vpn `-GatewaySku VpnGw1 `-VpnType RouteBased `-EnableBgp $true `
-IpConfigurations $GatewayIpConfig `
-VpnClientRootCertificates $CertificateForVpn `
-VpnClientAddressPool '172.16.0.0/24' `
-Tag $Tags
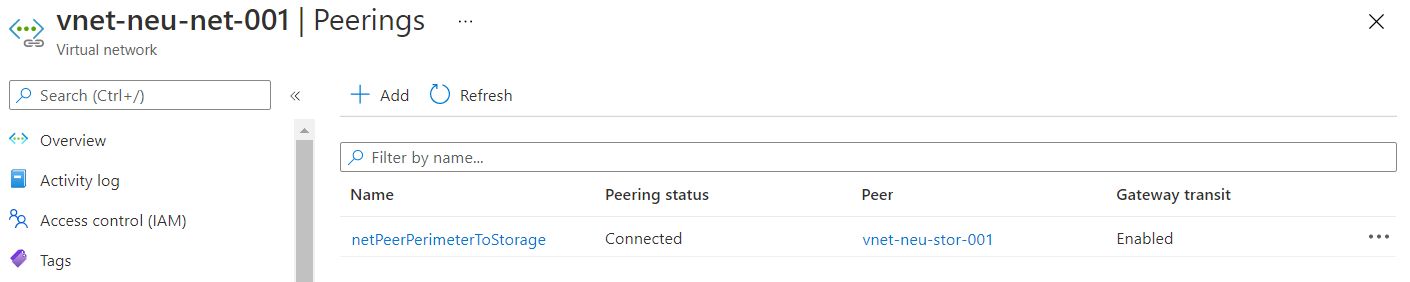
Step 8: Peering the VNets
Up till now, we have 2 separate VNets that are unable to communicate with each other. If the VPN client had to be downloaded and installed, the Storage Account VNet will be unreachable, since there is no route from the VPN to the storage account
C:\>route print 10*
===========================================================================
Interface List
 16...** ** ** ** ** ** ......Realtek PCIe GBE Family Controller
 42...........................vnet-neu-net-001
  3...** ** ** ** ** ** ......Microsoft ******
  6...** ** ** ** ** ** ......Microsoft ******
  7...** ** ** ** ** ** ......Qualcomm *******
 19...** ** ** ** ** ** ......Bluetooth *******
  1...........................Software Loopback Interface 1
===========================================================================

IPv4 Route Table
===========================================================================
Active Routes:
Network Destination        Netmask          Gateway       Interface  Metric
         10.1.0.0      255.255.0.0         On-link        172.16.0.2     43
     10.1.255.255  255.255.255.255         On-link        172.16.0.2    281
    104.45.84.174  255.255.255.255      192.168.0.1     192.168.0.23     36
===========================================================================
Persistent Routes:
  None

IPv6 Route Table
===========================================================================
Active Routes:
  None
Persistent Routes:
  None
To get the route to the Storage Account accessible form the VPN it is important to peer the 2 VNets in the solution. The peering will create the route required.
Note: If a VNet peer is create after the VPN client has been downloaded, a new version of the VPN client will need to be downloaded to reflect the change.
Write-Host -ForegroundColor Yellow "Enable VNet Peering"
Add-AzVirtualNetworkPeering `-Name netPeerPerimeterToStorage `-VirtualNetwork $VnetNetwork `
-RemoteVirtualNetworkId $VnetStorage.Id `
-AllowGatewayTransit `-AllowForwardedTrafficAdd-AzVirtualNetworkPeering `-Name netPeerStorageToPerimeter `-VirtualNetwork $VnetStorage `
-RemoteVirtualNetworkId $VnetNetwork.Id `
-UseRemoteGateways `-AllowForwardedTraffic
Step 9: Creating the File Share
Write-Host -ForegroundColor Yellow "Creating the Storage Account"
$StorageAccount = New-AzStorageAccount `
-Name "stor$($AzureEnvironment.Code)fs001" `
-ResourceGroupName $RgStorage.ResourceGroupName `
-SkuName Standard_LRS `-Location $AzureEnvironment.Location `
-Kind StorageV2 `-AccessTier Hot `-EnableHttpsTrafficOnly $true `
-EnableLargeFileShare `-AllowBlobPublicAccess $false
Write-Host -ForegroundColor Yellow "Creating the File Share"
$FileShareDrive = New-AzStorageShare `
-Name $ShareName `
-Context $StorageAccount.Context
Set-AzStorageShareQuota `-Share $FileShareDrive.CloudFileShare `
-Quota 1024
Write-Host -ForegroundColor Yellow "Set Storage Account Security"
Update-AzStorageAccountNetworkRuleSet `-ResourceGroupName $RgStorage.ResourceGroupName `
-StorageAccountName $StorageAccount.StorageAccountName `
-Bypass 'AzureServices' `
-VirtualNetworkRule (@{ `
VirtualNetworkResourceId="$($VnetNetwork.Subnets.Where({$_.Name -eq 'gatewaysubnet'}).Id)"}) `
-DefaultAction Deny
Lines 188 to 207, create the Storage Account and a file share called ‘testshare’, in this case, with a quota of 1TB.
Lines 211-213 will secure the Storage Account by limiting which networks are allowed to access the Storage Account content.
Step 10 (Optional): Creating a Private Link
When the file share is to be mounted on Azure VMs, a Private Endpoint can be used. Furthermore, a private endpoint can also be used to provide a custom domain FQDN to the file share instead of the Azure FQDN. This might be more ideal in enterprise setups.
The code snippet below provides the necessary steps to create the private endpoint, a private DNS and to register the the private endpoint with the DNS.
Write-Host -ForegroundColor Yellow "Creating the Storage Private Link"
$FileShareConnection = New-AzPrivateLinkServiceConnection `
-Name "$($FileShare.StorageAccountName)-Connection" `
-PrivateLinkServiceId $StorageAccount.Id `
-GroupId "file"
Add-AzVirtualNetworkSubnetConfig `-Name "snet-fileshare" `
-AddressPrefix "10.2.0.0/27" `
-VirtualNetwork $VnetStorage `
-PrivateEndpointNetworkPoliciesFlag DisabledSet-AzVirtualNetwork -VirtualNetwork $VnetStorage
# Getting the refreshed subnet details$SnetFileShare = (Get-AzVirtualNetwork `
-Name $VnetStorage.Name `
-ResourceGroupName $RgNetworking.ResourceGroupName).Subnets.Where({$_.Name -eq $SnetFileShare.Name }) `
| Select -First 1
$PrivateEndPoint = New-AzPrivateEndpoint `
-Name "$($StorageAccount.StorageAccountName)-PrivateEndPoint" `
-ResourceGroupName $RgStorage.ResourceGroupName `
-Location $AzureEnvironment.Location `
-Subnet $SnetFileShare `
-PrivateLinkServiceConnection $FileShareConnection
Write-Host -ForegroundColor Yellow "Creating the Private DNS"
$PrivateDns = New-AzPrivateDnsZone `
-ResourceGroupName $RgNetworking.ResourceGroupName `
-Name "pdns-$($AzureEnvironment.Code)-net-001.mydomain.com" `
-Tag $Tags
New-AzPrivateDnsVirtualNetworkLink `-ResourceGroupName $RgNetworking.ResourceGroupName `
-ZoneName $PrivateDns.Name `
-Name $PrivateEndPoint `
-VirtualNetwork $VnetStorage
$PrivaeDnsConfig = New-AzPrivateDnsZoneConfig `
-Name $PrivateDns.Name `
-PrivateDnsZoneId $PrivateDns.ResourceId
New-AzPrivateDnsZoneGroup `-ResourceGroupName $RgStorage.ResourceGroupName `
-Name "FileSharePrivateLinkGroup" `
-PrivateEndpointName $PrivateEndPoint.Name `
-PrivateDnsZoneConfig $PrivaeDnsConfig
tl;dr of the steps
Step 1: Declaring some variables that will be used
Step 2: Creating the Resource Groups
Step 3: Creating the VPN Subnet
Step 4: Creating the Virtual Networks (VNets)
Step 5: Creating a Public IP resource for the VPN
Step 6 (Optional): Creating Self-Signed Certificates
Step 7: Creating the VPN
Step 8: Peering the VNets
Step 9: Creating the File Share
Step 10 (Optional): Creating a Private Link
Full code for the article can be downloaded from https://gist.github.com/kdemanuele/ae26ca958872fbfb86bd8212b16b2cc3