
Complete code was updated on 15 June 2016 to an issue with an undefined method
Every business captures different information about their business. Magento gives businesses the ability to define which customer information is to be gathered and stored in Magento. The customer information customisation is done through customer attributes.
The last few versions of Magento 1.X gave the flexibility to create customer attributes in Magento backend. However as at Magento 2 0.74.0-beta9 the backend functionality has not yet been implemented, so customer attributes need to be created programmatically.
Scripting the customer attributes
The steps outlined below assume that we are working on an extension called Clounce_Customer. For details of how to create the extension base refer to the article, A very basic Magento 2 module.
To create new customer attributes programmatically:
1. Create the “Setup” folder under the module code
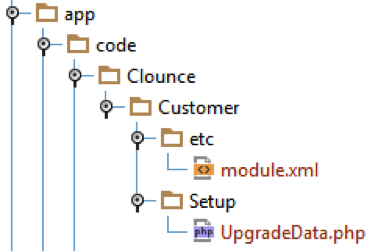
2. Create the file “UpgradeData.php” under the “Setup” folder.
Note: While in Magento 1.X each version upgrade had its own file stating the version change, in Magento 2 there are only 4 main files. The "InstallData.php" and "UpgradeData.php" for data related scripts; and "InstallSchema.php" and "UpdateSchema.php" for database table creation and modifications. As all updates need to be handled through one file it is important to keep in mind that each run of the UpgradeData.php will execute all the commands in the file. Therefore all database updates need to consider data overriding and multiple re-runs.
- In the UpgradeData.php file create a class called UpgradeData that implements the UpgradeDataInterface.
class UpgradeData implements UpgradeDataInterface
{
}
- In Magento the Customer entity is an EAV model, therefore we will need an EAV setup model. To obtain the EAV setup model we have to override the constructor method to pass it an object of type EavSetupFactory.
/**
 * Init
 *
 * @param EavSetupFactory $eavSetupFactory
 */
public function __construct(EavSetupFactory $eavSetupFactory)
{
    $this->eavSetupFactory = $eavSetupFactory;
}
- The next step is to implement the method defined by the UpgradeDataInterface.
/**
 * Installs data for a module
 *
 * @param ModuleDataSetupInterface $setup
 * @param ModuleContextInterface $context
 * @return void
 */
public function upgrade(ModuleDataSetupInterface $setup, ModuleContextInterface $context)
{
}
- Currently we have a standard upgrade class that does nothing and an EavSetupFactory that cannot run updates. The first step is to obtain an instance from the EavSetupFactory which will execute our attribute creation commands.
/** @var EavSetup $eavSetup */
$eavSetup = $this->eavSetupFactory->create(['setup' => $setup]);
- Next we need to define the customer attributes to be created or updated. In this article we will defined the attributes as an associative array with the key being the attribute code and the value being an array of attribute options.
$attributes = [
    'custom_1' => [
        'type' => 'int',
        'label' => 'A Yes/No Option',
        'input' => 'select',
        'source' => 'Magento\Eav\Model\Entity\Attribute\Source\Boolean',
        'required' => true, /* The field is required */
        'default' => '0', /* Defaults to the No value */
        'sort_order' => 100,
        'system' => false, /* A custom attribute */
        'position' => 100,
        'adminhtml_only' => 1, /* Do not show on frontend */
    ],
    'custom_2' => [
        'type' => 'varchar',
        'label' => 'Some custom text',
        'input' => 'text',
        'sort_order' => 101,
        'validate_rules' => 'a:2:{s:15:"max_text_length";i:255;s:15:"min_text_length";i:1;}',
        'position' => 101,
        'system' => false,
     /* 'adminhtml_only' => 0, --- If the attribute is visible in frontend and backend this line is not required. */
    ],
];
- Now that the attributes array is defined, the attributes need to be created in Magento. In this article we create the attributes by looping over the array and call addAttribute() on each attribute defined.
foreach ($attributes as $code => $options) {
    $eavSetup->addAttribute(
        \Magento\Customer\Model\Customer::ENTITY,
        $code,
        $options
    );
}
- As a final step for setting up customer attributes we need to set the forms in which the attributes will be used. Looking at the CustomerSetup.php that is provided by Magento 2, one will notice that the class contains a generic method to assign the attributes to the form based on their visibility. As the CustomerSetup class was not extended in this example, we can copy the method to our script and call it at the end of the upgrade method.
- Finally we need to run the upgrade script in Magento. To do this from the server command line run the command
php bin/magento upgrade
The full code for this article’s UpgradeData.php file is:
<?php
/**
 * Copyright © 2015 Clounce. All rights reserved.
 * See LICENSE.txt for license details.
 */

namespace Clounce\Customer\Setup;

use Magento\Customer\Model\Customer;
use Magento\Eav\Setup\EavSetup;
use Magento\Eav\Setup\EavSetupFactory;
use Magento\Framework\Setup\UpgradeDataInterface;
use Magento\Framework\Setup\ModuleContextInterface;
use Magento\Framework\Setup\ModuleDataSetupInterface;

class UpgradeData implements UpgradeDataInterface
{
    /**
     * Init
     *
     * @param EavSetupFactory $eavSetupFactory
     */
    public function __construct(EavSetupFactory $eavSetupFactory)
    {
        $this->eavSetupFactory = $eavSetupFactory;
    }

    /**
     * A central function to return the attributes that need to be created
     *
     * Updated on 15 June 2016, following Anamika comment
     **/
    private function getNewAttributes()
    {
        return [
            'custom_1' => [
                'type' => 'int',
                'label' => 'A Yes/No Option',
                'input' => 'select',
                'source' => 'Magento\Eav\Model\Entity\Attribute\Source\Boolean',
                'required' => true, /* The field is required */
                'default' => '0', /* Defaults to the No value */
                'sort_order' => 100,
                'system' => false, /* A custom attribute */
                'position' => 100,
                'adminhtml_only' => 1, /* Do not show on frontend */
            ],
            'custom_2' => [
                'type' => 'varchar',
                'label' => 'Some custom text',
                'input' => 'text',
                'sort_order' => 101,
                'validate_rules' => 'a:2:{s:15:"max_text_length";i:255;s:15:"min_text_length";i:1;}',
                'position' => 101,
                'system' => false,
                /* 'adminhtml_only' => 0, --- If the attribute is visible in frontend and backend this line is not required. */
            ],
        ];
    }
    /**
     * Installs data for a module
     *
     * @param ModuleDataSetupInterface $setup
     * @param ModuleContextInterface $context
     * @return void
     */
    public function upgrade(ModuleDataSetupInterface $setup, ModuleContextInterface $context)
    {
        /** @var EavSetup $eavSetup */
        $eavSetup = $this->eavSetupFactory->create(['setup' => $setup]);

        $attributes = $this->getNewAttributes();

        foreach ($attributes as $code => $options) {
            $eavSetup->addAttribute(
                Customer::ENTITY,
                $code,
                $options
            );
        }

        $this->installCustomerForms($eavSetup);
    }

    /**
     * Add customer attributes to customer forms
     *
     * @param EavSetup $eavSetup
     *
     * @return void
     * @SuppressWarnings(PHPMD.CyclomaticComplexity)
     * @SuppressWarnings(PHPMD.NPathComplexity)
     */
    public function installCustomerForms(EavSetup $eavSetup)
    {
        $customer = (int)$eavSetup->getEntityTypeId(\Magento\Customer\Model\Customer::ENTITY);
        /**
         * @var ModuleDataSetupInterface $setup
         */
        $setup = $eavSetup->getSetup();

        $attributeIds = [];
        $select = $setup->getConnection()->select()->from(
            ['ea' => $setup->getTable('eav_attribute')],
            ['entity_type_id', 'attribute_code', 'attribute_id']
        )->where(
            'ea.entity_type_id IN(?)',
            [$customer]
        );
        foreach ($eavSetup->getSetup()->getConnection()->fetchAll($select) as $row) {
            $attributeIds[$row['entity_type_id']][$row['attribute_code']] = $row['attribute_id'];
        }

        $data = [];
        $attributes = $this->getNewAttributes();
        foreach ($attributes as $attributeCode => $attribute) {
            $attributeId = $attributeIds[$customer][$attributeCode];
            $attribute['system'] = isset($attribute['system']) ? $attribute['system'] : true;
            $attribute['visible'] = isset($attribute['visible']) ? $attribute['visible'] : true;
            if ($attribute['system'] != true || $attribute['visible'] != false) {
                $usedInForms = ['customer_account_create', 'customer_account_edit', 'checkout_register'];
                if (!empty($attribute['adminhtml_only'])) {
                    $usedInForms = ['adminhtml_customer'];
                } else {
                    $usedInForms[] = 'adminhtml_customer';
                }
                if (!empty($attribute['admin_checkout'])) {
                    $usedInForms[] = 'adminhtml_checkout';
                }
                foreach ($usedInForms as $formCode) {
                    $data[] = ['form_code' => $formCode, 'attribute_id' => $attributeId];
                }
            }
        }

        if ($data) {
            $setup->getConnection()
                ->insertOnDuplicate($setup->getTable('customer_form_attribute'), $data);
        }
    }
}
Running the script multiple times
Once the upgrade script has been executed any further calls to the upgrade command will not perform any changes. There are a few ways to have the script re-executed.
Method 1: Upgrading the module version
Any easy way to re-run the script is to increment the version number in module.xml. The attribute setup_version in the module XML element is used by Magento to know if the module has changed. By incrementing the build number in the setup_version attribute and calling the upgrade command, the UpgradeData script will get executed again.
Note: Magento 2 will not run install and upgrade scripts automatically like in Magento 1.X but they must be triggered through the command line.
Method 2: Reduce the module version from the database
Another way to rerun the upgrade script without changing the module version in the code is to change the version in Magento database. The table setup_module contains a list of modules installed and their current setup and data version. Locate the module entry and change the data_version value for the module to a value lower than the current version in the code. When the upgrade command is executed Magento will notice the version in the database is lower than the one published in the code and will re-run the upgrade scripts.
Method 3: Removing the module resource from the database
For upgrade scripts it is easy to play around with version numbers. However install scripts run only when the module is being initialised the first time. Therefore changing the module version will not rerun the install script. To rerun an install script, it is important to delete the extension reference from the database.
Full code with frontend available on Github.